 Oct, 12 2025
Key Takeaways
- Know the three common signs that your suspension needs attention.
- Perform a quick bounce test in under a minute to spot worn shocks or struts.
- Use a wheel‑rim ruler or a corner‑weight scale for a more accurate ride‑height check.
- Inspect bushings, control arms, and sway bars for cracks or excessive play.
- If any test fails, plan a professional alignment or component replacement.
When your car feels mushy, bounces like a pogo stick, or pulls to one side, the suspension is often the culprit. Testing it yourself can save money and prevent unsafe driving. Below is a step‑by‑step guide that walks you through visual checks, simple bounce tests, and a few slightly more involved measurements-all without needing a garage lift.
Vehicle suspension is a system of springs, shock absorbers, control arms, bushings, and other components that keep your tires in contact with the road while absorbing bumps. It works together with the steering and chassis to deliver stability, comfort, and handling.
Why Test Your Suspension?
Every component in the suspension wears out over time, especially in regions with harsh winters like Hamilton. Ignoring early wear can lead to uneven tire wear, reduced braking efficiency, and even loss of control. A quick test helps you catch problems before they become expensive repairs.
Job 1: Spot the Warning Signs
Before you grab any tools, run a mental checklist while driving:
- Excessive bouncing after hitting a curb or speed bump.
- One corner of the car feels lower than the others.
- Steering wheel vibrates at highway speeds.
- Uneven tire tread wear (inner or outer edges).
- Clunking or squeaking noises when turning or going over bumps.
If any of these show up, you’re ready for the hands‑on part.
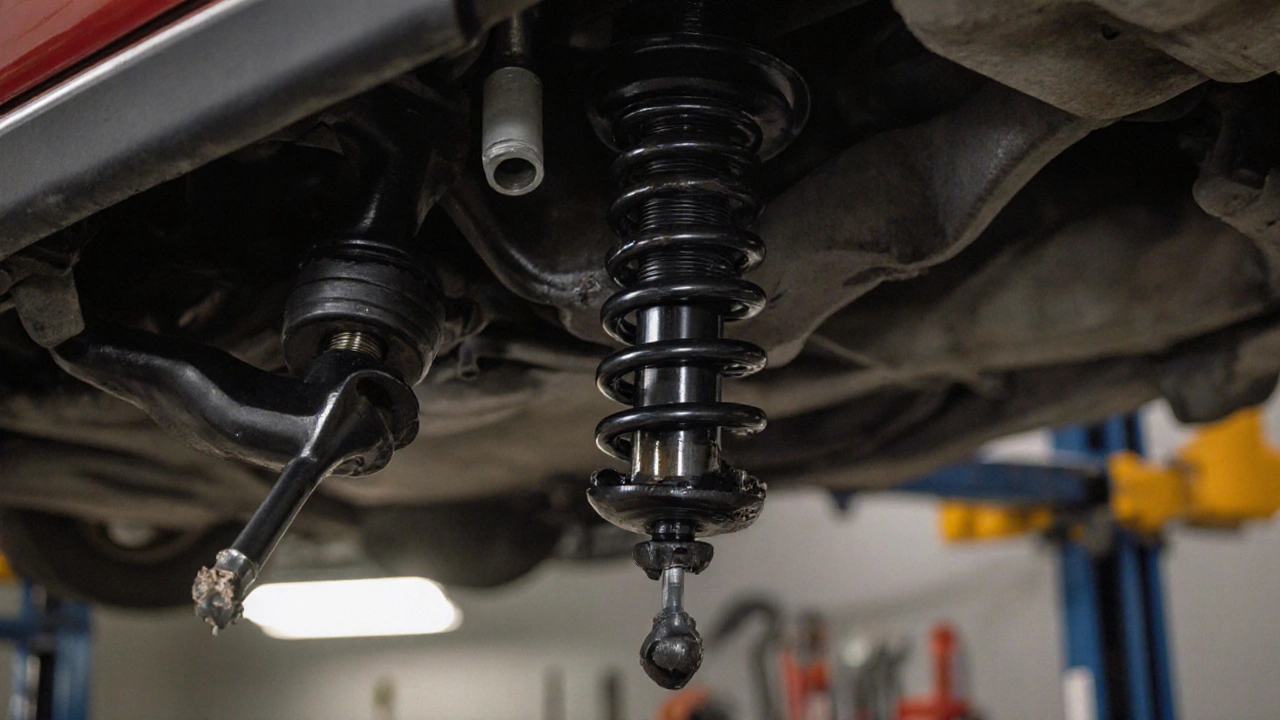
Job 2: Visual Inspection of Key Components
Pop the hood and shock absorber or strut is the first thing to glance at. Look for oil leaks, dents, or a broken mount. Next, check the coil spring for cracks or broken coils. Then move to the lower control arm and its bushing. Any visible wear, rust, or looseness is a red flag.
Don’t forget the sway bar and its end links. These keep the chassis from rolling too much in corners. A cracked link will cause noticeable body roll.
Job 3: The Bounce Test (DIY Quick Check)
- Park the car on a flat surface, engage the parking brake, and turn the engine off.
- Press down firmly on the front of the hood (or rear trunk) near the center of the vehicle.
- Release quickly and watch how the car rebounds.
If the car bounces more than once before settling, the shocks/struts are likely worn. A single, smooth return indicates they’re still doing their job.
For added confidence, repeat the test on each corner. Different bounce characteristics between front and rear often point to uneven wear.
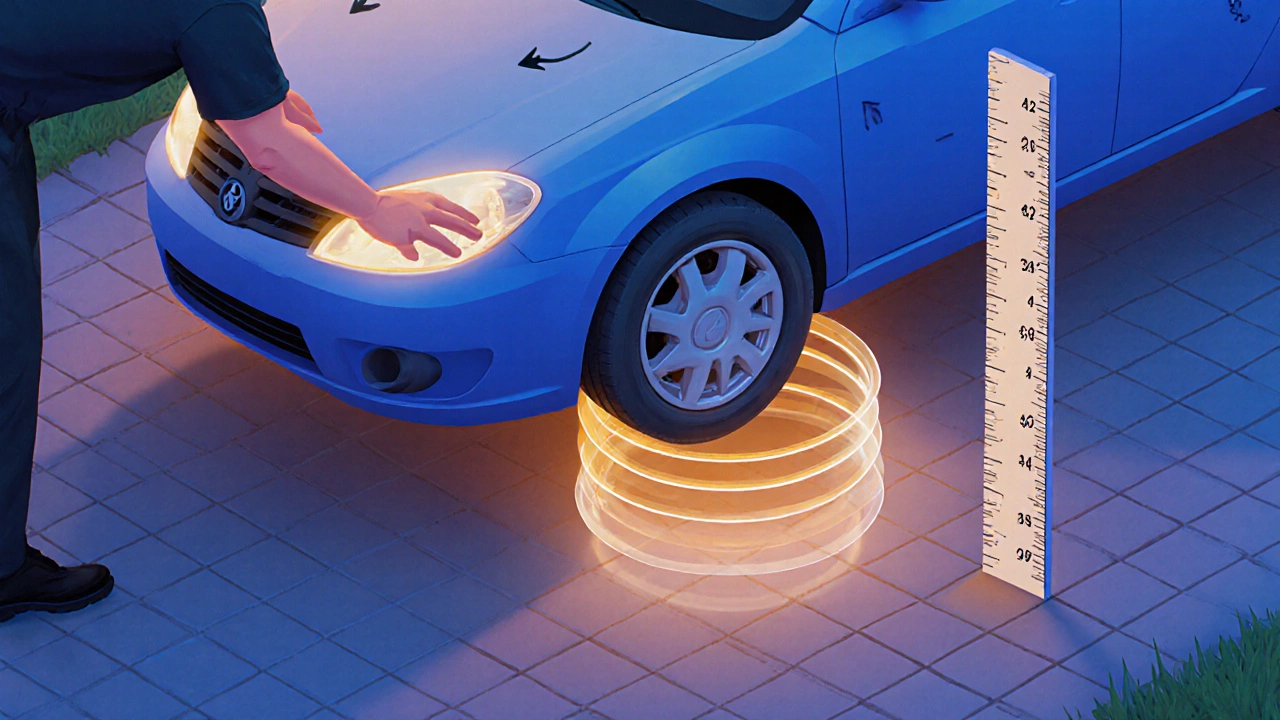
Job 4: Ride‑Height and Corner‑Weight Check
Ride height is the distance from the ground to a reference point on the chassis (often the wheel rim). Consistency across all four wheels is a sign of even spring rates and proper load distribution.
Tools you can use:
- A simple wheel‑rim ruler (measure from the ground to the top of the wheel well).
- A corner‑weight scale (often found at performance shops) for more precise load readings.
Measure each corner and note the values. If one corner reads significantly lower (e.g., 0.5inches less), the spring may be sagging or the coil may be broken.
Job 5: Alignment and Camber Check (Optional DIY)
While a full alignment needs a machine, you can get a rough idea of camber and toe using a straightedge and some string.
- Attach a string to the front of the tire and pull it taut horizontally. Measure the gap at the top of the tire; a larger gap means negative camber.
- For toe, measure the distance between the front edges of the two front tires compared to the distance between the rear edges. A difference indicates toe‑in or toe‑out.
If the numbers are outside the factory specs (usually listed in the owner’s manual), schedule a professional alignment.
Job 6: When to Call a Pro
Even the best DIY test can miss internal damage. If you notice any of the following, it’s time for a certified mechanic:
- Persistent clunking that changes with steering direction.
- Visible damage to any suspension component during visual inspection.
- Uneven ride‑height that can’t be corrected by adjusting spot‑welded shims.
- Failure of the bounce test combined with poor handling.
Professional shops have chassis dynamometers and computer‑readouts that pinpoint worn bushings, cracked frames, or broken mounts far more accurately.
Quick Comparison: DIY Tests vs. Professional Service
| Aspect | DIY (Home) | Professional Shop |
|---|---|---|
| Tools Required | Basic hand tools, ruler, optional corner‑weight scale | Alignment rack, chassis dynamometer, lift |
| Time Needed | 10‑30 minutes | 1‑2 hours |
| Accuracy | Good for obvious issues | High‑precision, detects hidden wear |
| Cost | Free‑to‑low (scale rental $20‑$30) | $80‑$150 for full inspection |
| Typical Findings | Leaking shocks, sagging springs, major clunks | Worn bushings, micro‑cracks, alignment angles |
Pro Tips to Avoid Common Pitfalls
- Always test on a level surface; an incline skews ride‑height readings.
- Warm‑up the car for a few minutes before testing; cold suspension components can feel stiffer.
- When measuring camber with a string, keep the string perfectly horizontal - even a slight tilt adds error.
- Record each measurement (date, temperature, tire pressure) so you can track wear over time.
- Replace only the worn part; mixing new shocks with old springs can lead to uneven handling.
Regularly testing your suspension not only keeps the ride comfortable but also protects your tires, brakes, and steering components. A few minutes a month can save you hundreds in parts and keep you safe on the road.
Frequently Asked Questions
How often should I test my car’s suspension?
A quick visual and bounce check every 6‑12 months is enough for most drivers. If you notice any of the warning signs, test immediately.
Can I use a smartphone app to measure camber?
There are apps that pair with a Bluetooth inclinometer, but accuracy varies. For a rough check, the string method works fine; for precise angles, head to a professional alignment shop.
What’s the difference between a shock absorber and a strut?
Both dampen spring motion, but a strut also serves as a structural component of the suspension, replacing the upper control arm in many front‑end designs.
Is it safe to drive with a sagging spring?
Driving with a visibly sagging spring reduces handling stability and can stress other components. Replace or repair it before hitting high speeds or rough roads.
Do I need to reset the suspension after replacing a component?
Yes. New shocks or springs often require a full alignment and sometimes a ride‑height adjustment to bring the vehicle back within factory specs.